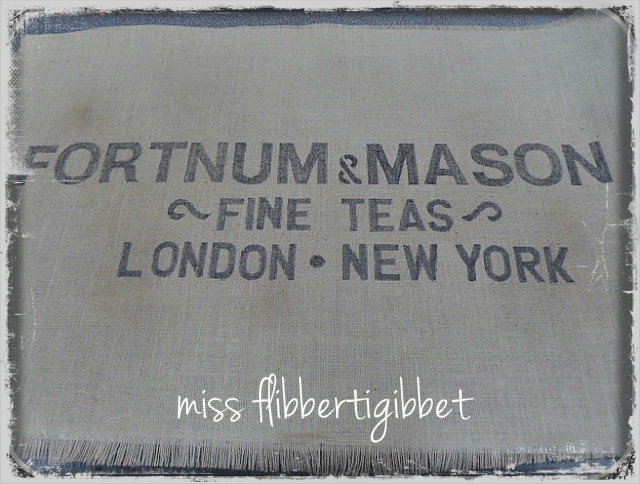
The all time favorite piece from my recent Porch Sale had to be this burlap topped table….
I realize there is a glare but when I took the pic it seemed OK and the table sold a few hours later so I didn’t have another chance.
Sorry!
But, this was the most popular piece of the day and I wanted to share with you how easy it is to do.
Let’s get started…….
First off, understand that this was a busy, busy couple of weeks since I do all the work myself and still have to manage a household of 8 which included
meals, grocery shopping, taking kids places, attending kid functions and squeezing in some time with my husband.
So, I often did something and thought…”darn, I should have taken a picture of that!”.
I’m sure you’ve been there! All in all, I think there’s enough to see for all you savvy folks out there.
Here is the original table as I’m painting it.
Just a very plain wood sofa table. Nothing special.
Welcome to my fancy painting booth…..yes that is a trash can it is sitting on……
but I do have the advantage of looking at the creek while I work.
I spray painted the table with white primer and then with Heirloom White….
my very favorite go-to spray paint. It’s by Rustoleum.
It looks creamy when it goes on, but then dries to a nice cottage off-white color.
After this coat, I gave it an aged look by spattering with some brown. No pic of that.
Table set aside for now and I started working on the burlap top.
This is a burlap fabric I bought from a decorator fabric store….like Calico Corners.
You’ll notice it is slightly tighter in weave than the usual burlap from the fabric store.
Plus it has less of those nubby bits in it.
I have had this idea for awhile and been searching for a smoother burlap.
I found it in Charleston SC when I visited my daughter.
We went to gdc HOME in Summerville and I found it there.
I have looked for the receipt but can’t find it.
So, I can’t tell you what the price per yard was but it was much less than the $28/yd Scottish burlap that was my first consideration.
Suffice to say that I bought a nice roll of it for future projects.
Here are the tools….
Is that a Sharpie marker? Yes it is….and there’s my real trick.
I have been stenciling on fabric using India ink and it was fine..
just less precise and more messy.
One day I had the realization that a Sharpie is just ink in a pen.
I tried it on a linen pillow and was very pleased with the result….and in half the time!
So, that’s what we’re using for this project.
Choose what you want to write, get your stencils or make a stencil, measure out the spacing and go to it. Just trace the letters right on to the fabric.
I chose to write:
Fortnum & Mason
Fine Teas
London * New York
I added a crown above the type but don’t have a pic of that…sorry.
For that, I just printed one out, cut it out with an x-acto blade and traced it on there.
After you’ve finished stenciling, you can age the fabric a bit with whatever you like. I used Walnut Ink and rubbed it in a bit.
Now to attach it to the table. Here are the tools….
Upholstery tacks of your choice and a small hammer.
Center the fabric on the table and secure the center of each side.
Pull it slightly taut but don’t distort the grain too much.
Now, this needs some finessing and a gentle hand.
Decide how close the tacks will be to each other. Here is what I did…..
There is about a 1 in spacing between each tack. You can do more or less.
The tacks are not terribly expensive and I think closer would look just as nice.
I don’t think you can space them too much or the fabric will not be nice and taut.
I put a tack in the center, then I worked my way toward the corner,
stopping about 5-6 in from the corner.
Make a nice fold. Cut away any excess fabric to make it lie flat.
But, remember that the tack will press the fabric down firmly.
I see it looks a bit pointy here, like it is sticking out, but that’s just the picture,
it looked better in person! Continue all around the table.
This treatment is perfect for a top that is too damaged to repair.
I ordered a piece of glass for the top and spent about $36 on that.
My hubby told me I went to a more expensive place so I’ll remember that next time.
But the glass added a very nice, upscale touch which I felt was needed.
As I said, it sold the first day. I plan on doing this treatment again
because it was easy and impressive.
Here it is again…..see the crown?
This would make a great desk, dressing table, hall table, bedside table……
My daughter is now going to have me help her cover her two nightstands….
the advantage of having a re-purposing Mom!
Sharing with


 I'm Lorraine. I have a love for home & design and I enjoy sharing that passion with others. I'm so glad you're here to join me.
email: missflibbertigibbet@gmail.com


Oh, I just love your burlap topped table! So pretty and I am going to have to try this.
~Pam
pamspaintparlor.typepad.com
This is crazy good!
Totally love this!! Following you along- stop by and say hello sometime!
This is absolutely fabulous! Thanks so much for sharing. Blessings.
OMG … This is so beyond fabulous! I love it. I love that you didn’t write in French, hee hee. This is giving me lots of ideas!
~ Christie
This comment has been removed by the author.
I think this was the best piece! I so loved it and already have my piece ready to go! I am following what you did and can’t wait to see how it turns out! Great job!
Thank you all for your wonderful comments! it’s so appreciated by a newbie like me!
I’m stopping back by to say thanks for linking up at Feathered Nest Friday ~ sharing this on FB today! 🙂
You did an awesome job. Love the nail heads, and the stenciling.
LOVE….nuff said!
I like this a lot! What a great idea.
I shared this awesome table on my blog – Furniture Fix Friday!! Check it out at Chic-Tiques.com/blog!! 🙂 Very creative – I love it!
beautiful table, so unique, id love to feature it if that would be ok with you please let me know,
lauren
Wow! How exciting! I love the stuff on your blog and am now a follower! I’d be very honored to be featured!
wow this is gorgeous i love it, thanks for sharing, new follower here xxx
Really love this! So do they smooth the edges of the glass and how thick do you order the glass?
Thanks for stopping by Sandy! If you tell the glass shop that you are using it for a tabletop, they will finish the edges and make it the correct thickness. You don’t have to choose anything special. Mine was approx 21 x 36 and cost $36.
Oh my Stars I have been thinking of something like this and you have gone and done it….SO GORGEOUS!! I am just in ((((((LOVE)))))!!
Very nice!
sorry i didnt see you had replyed on your blog, ill be doing the feature this monday, thank you
Amazing!!! I love this idea. New follower 🙂
Cute! Cute!
Merry Christmas!
:)Heidi
OK, that’s cute. I could do that – no sewing involved. Now I’m looking around yet again at my household “stuff” for what can have burlap stenciled to it. Nothing is safe in my home since blogging started.
~Bliss~
I’ve commented to all of you on email but love this new format which will let me comment right after your post! It’s so much better than trying to refer to everyone by name! So keep on following and I love to read your comments!
Thanks Bliss…happy burlapping!
What a great idea…you did a fabulous job on this, and burlap can be tricky to work with because the grain is so flexible – Love it, Well done!
Thanks so much!
Lorraine
Wow!!! great idea I am going to try to do one myself.
Thanks
Bernice
I am so going to copy this. Of course, I will link back to you. I am also going to devote my weekend to finding something to do this project with. It’s fantastic! Thanks.
Very pretty! You did a great job and made it look so simple. Thanks.
LOVE your blog! I’m a new follower. I need tips…
Where did you get the stencils? Also, how do you decide what random words to put on these kinds of projects? I have a hard time not thinking about it too much but thinking about it just enough…
I picked up a Captain Morgan Display I want to use as a side table. Can’t wait to do this technique. Perfect, thanks!